
Note: There are two ways to email your members. For quick and easy communication, use the membership module, detailed in this help document. For sending newsletters, utilise the email campaign module. For further details on the latter option, click here: Send an Email Campaign.
Email your members directly from the membership area with the Email Members button.
You will find this at the top of the Membership area when you click on Members in the left navigation.

Selecting email recipients
First, select your email recipients by searching for your members. If you're emailing all members, you can skip this step. However, if you want to target members based on tags, membership levels, or membership products, use the Advanced Search to filter your list accordingly.
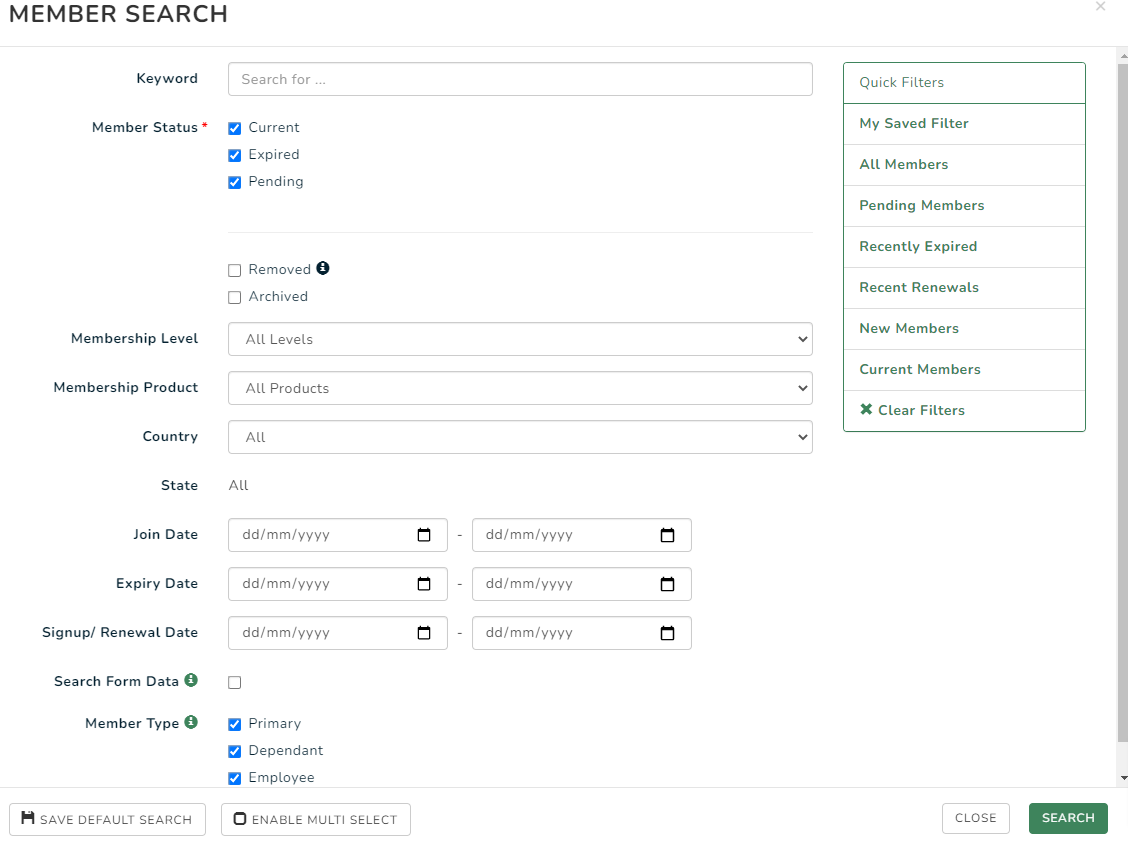
Clicking 'ENABLE MULTI SELECT' will allow you to select multiple membership levels and membership products. Please refer to your computer operating system help for how to make multiple selections. e.g. on Windows operating systems, you need to hold down Ctrl and left click on all required selections.
Once you have the search results for the list of members you intend to email, click on the email members button to start creating your email.
You will see the number of members you are going to email in the "To" field. Here you can click on the members to see a list of recipients.

Viewing and Managing Recipients
The Advanced Search option allows you to filter recipients based on their tags, membership level, or membership products. However, it does not allow you to manually remove specific members who meet the filter criteria.
To start, click 'View and Manage Recipients'. This will display all recipients for the email. The pop-up window will also show any muted accounts and blocked email addresses. For more details, please see [link].
To remove a recipient, click the bin icon. If you accidentally remove someone, you can click 'Refresh' to restore the original list.
.png?width=688&height=399&name=Member-Jungle-Membership-05-15-2025_03_56_PM%20(1).png)
Creating your email
Now that you have your email recipients, you can create your email.
- From Name: You can use your organisation name for this field or your memebrship admin
- From Address: Enter your email address
- Subject: Subject of your message
- Message: You can write your email from scratch in the Message field, or use the dynamic fields located in the right-hand column to automatically pull information from the member database. To insert a dynamic field, simply click on the one you want, and it will be added to your email content.
- Template:
You can also use and insert templates, which add in some different displays as shown below. 
- Insert Snippet:
You also have the option to save your message as a Snippet for future use, or insert a previously saved Snippet if you’ve created one before.

To insert a Snippet, simply click “Insert Snippet”. This will display all active email snippets that have been saved. For more details about email snippets, please see here Email Snippets.
- Template:
-
- Save as Snippet:
To save your email as a snippet, simply tick the ‘Save as Snippet’ option, then proceed with sending or previewing your email—it will be saved automatically.
- Save as Snippet:

Sending an email
Once you have completed your email, you will see your options at the bottom of the pop-up, where you can;

- Cancel sending the email. This will delete all contents and recipients.
- Preview the email in your browser. Please note that this may apply your website’s styling, which means the preview might not accurately reflect how the email will appear in recipients’ inboxes.
- Send Test - You can also send a test email to yourself to see how it will appear from the recipient's perspective.
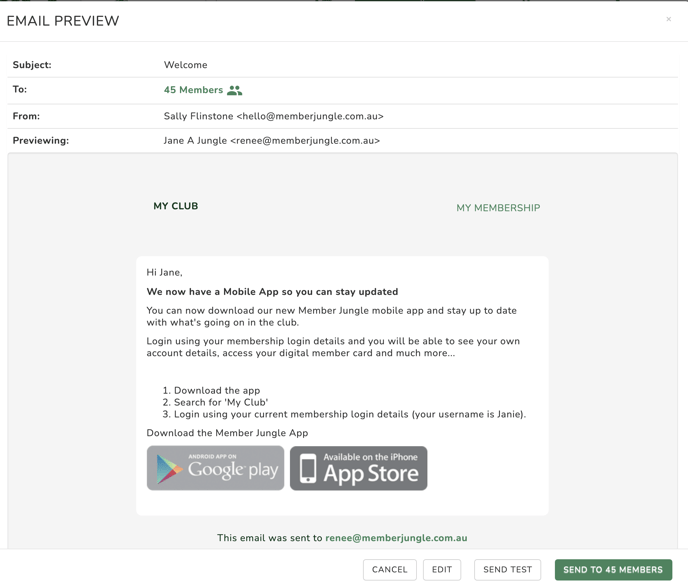
- Send to Members: will immediately send your email to the selected list of members. A progress bar will appear, and you’ll be notified once the email has been successfully sent.
.jpg?width=688&name=rtaImage%20(61).jpg)
Unlike the Email Campaign module, emails sent directly from the Membership area do not include tracking statistics. However, you can confirm whether an email was sent to a specific member by clicking on their name and navigating to the Email tab to view the list of sent emails. You can also check the Email Log module for a broader view of sent emails.
Emails sent from the Membership area are unlimited and free across all packages and do not count against your email campaign credits.
Sending Welcome Email when Launching
When you are first announcing your Member Jungle website and launching to members you will see there are two saved snippets in the system ready for you to use as a starting point.
If you follow the instructions above to select your members and insert a snippet, you will see there are two snippets ready to promote the new system and app to your members
- Download the Member Jungle App and
- Welcome Email Template.

If you add these snippets to your email it will give you content ready to edit, personalise, preview and send to your members and tell them all about your new system and how they can login and get started.
