
How you can create and manage your membership forms to collect different information from your members for each membership level at sign up and renewal.
Create & Edit Membership Forms
Restrict Field Access and Visibility
Restrict Field Access & Visibility
Membership Form Tutorial Video
To manage your membership forms, you need to login to your website and are required to have Editor Access of the Membership System.
- Click on Membership in the top navigation bar.
- On the far left in the navigation click on “Membership Levels” and select “List Levels”.
- Select the forms icon
 next to the membership level you wish to edit the form fields.
CREATE & EDIT MEMBERSHIP FORMS 
When your site is created, your membership level(s) will have a basic form already created. To customise and/or edit your membership forms, click on the form icon located to the right of the chosen level. You will be taken to your current form.
Note: All changes made in this area will be effective immediately on your website. There are three standard fields that you cannot delete/edit “Account Creation”, “Membership” and "Business Directory" (if applicable to your package). There is only very limited ability to edit those fields.
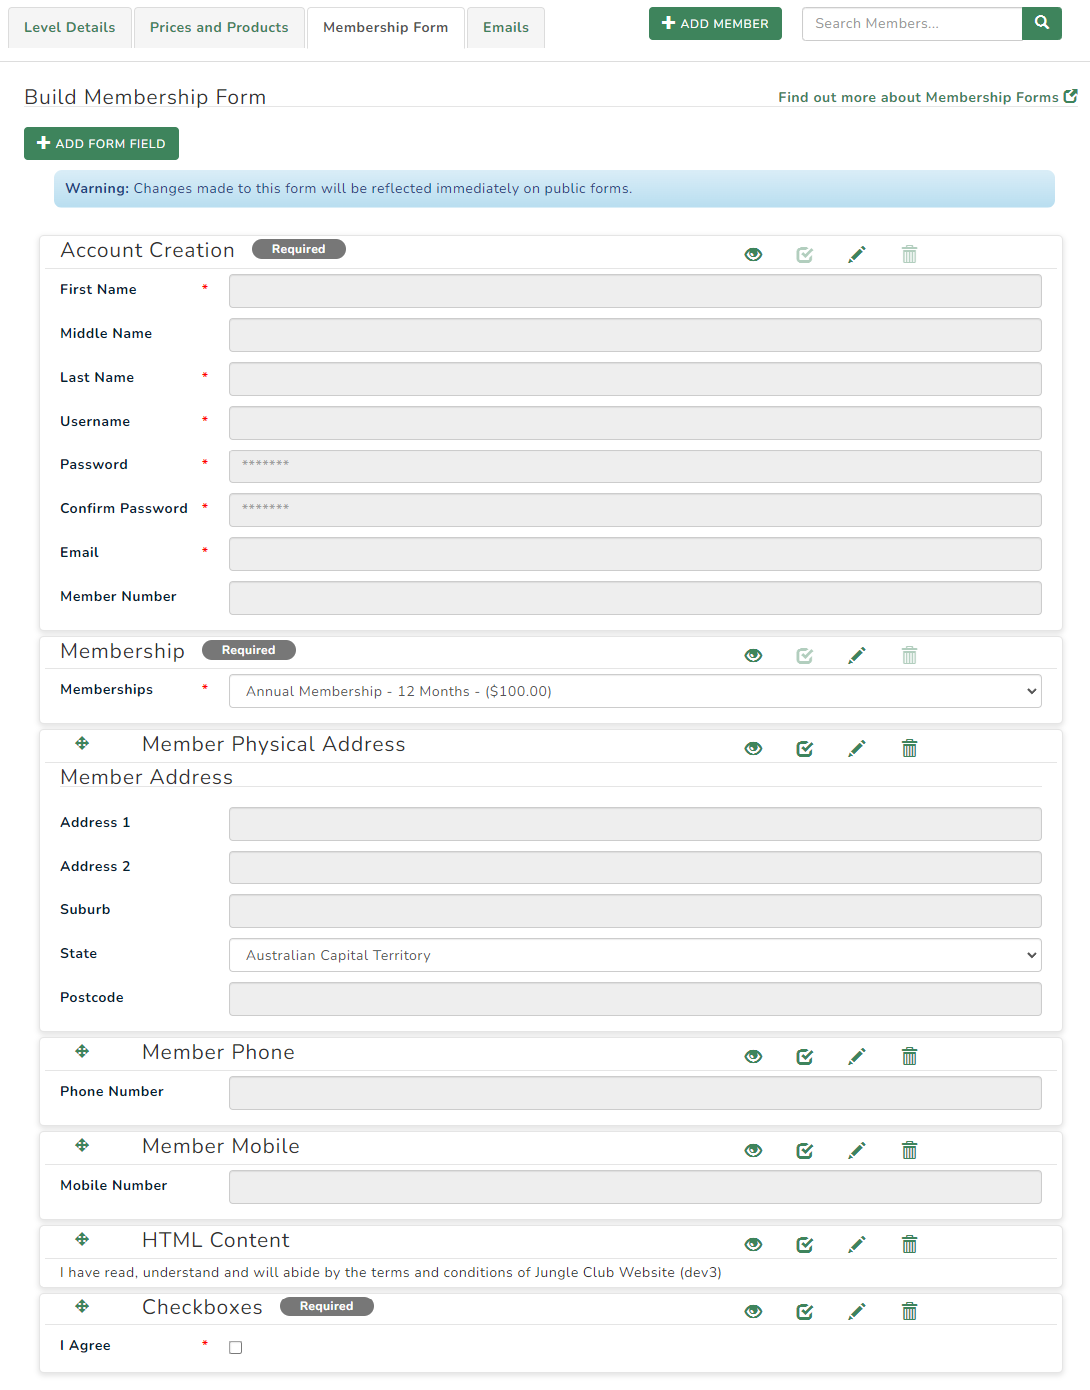
ICONS MEANINGS TO EDIT, HIDE, REORDER AND DELETE FIELDS
| Allows you to re-order your fields. Click on the arrow next to the field you wish to move and drag it to the place in the form you would like it to be. | |
| The eye allows you to show and hide fields in your membership form administration area to make it easier to view. It simply hides the input or option fields. | |
| This shows that the input or option fields are currently hidden in the membership form administration area. Click the icon to open the fields out. This has no impact on the live website. | |
| This allows you to inactivate the fields. This icon means that this field is currently active on your membership form. Click on this icon to deactivate the field. | |
| This allows you to activate the fields. This icon means that this field is currently inactive on your membership form. Click on this icon to activate the field. | |
|
This icon allows you to edit the field properties. |
|
| This icon allows you to delete the field. NOTE: This will delete all data that has ever been stored in this field plus remove the field from current application forms. | |
 |
This image appearing beside the field Label Name will show if the field is required, to edit this status click on the edit icon. |
 |
This image appearing beside the field Label Name will show if the field is currently inactive on the live site. To activate click on the red inactive square icon on the right hand side of the field (pictured above). |

|
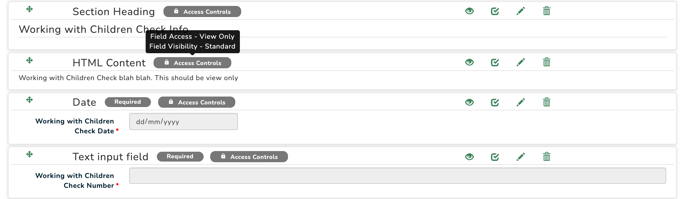
The Access Controls icon indicates that the field has some restrictions set for access and visibility for members. To view the settings, hover over this icon. To edit the access controls, click edit on the field and review/edit the settings accordingly. |
ADD A NEW FORM FIELD
To add a new field, click on the green “Add Field” Button located at the top left hand side of your form.
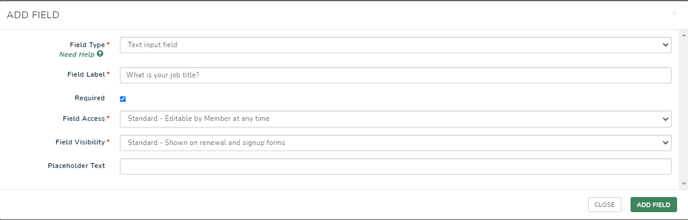
- Select which Field Type you require from the dropdown box (see below for more information on field types).
- Field Label: This is the name of your field that will appear on the form. It has a limited number of characters you can enter. You will need to add a HTML content field if you have a long description.
- Required: Yes/No – this will determine if the field is compulsory to complete the application.
Default/Placeholder Text: You can enter some text into this field as a placeholder until the user types in their answer. - Field Access: Select from the options as to when the field will be editable/accessible by members (See Restricting Field Access & Visibility for more information)
- Field Visibility: Select from the options as to when/if the field will be visible to members. (See Restricting Field Access & Visibility for more information)
Once you have completed the form click on the “Add Field” Button at the bottom right of the screen.
The field will be instantly added and live on your membership form.
To edit, delete, and re-order fields, please see the icon meanings above.
RESTRICT FIELD ACCESS & VISIBILITY
It is possible to set different restrictions on form fields, depending on what data you require from your members in the sign up and renewal process.
When you are adding or editing your form fields, you will have the option of setting the field access and the field visibility. These settings will give members access to the fields at various stages.
The explanations of these access settings are as follows:
Field Access
- Standard: These fields will be shown to members at sign up and renewal, and are available to be edited at any time by the member.
- Restricted: Members can set/edit the field at signup & renewal time only. They cannot edit this field in their members area at other times. The member can view the field at all times.
- Locked: Members can view this field at all times, but can not edit the field.
- Admin: Members never see this field. Only viewable & editable by administrators.
Field Visibility
-
Standard: Visible on signup and renewal forms.
-
Signup: Only visible on signup forms. Does not show when renewing.
-
Renewal: Only visible on renewal forms. Does not show when signing up.
Once you have restricted the access to these fields, you will see the restricted access icon display on the field in the membership level. Full details of the restriction settings will be displayed on hover.
EXPLANATION OF FIELD TYPES
- Captcha: If you have a captcha field on your form it will help reduce SPAM and prevents robots sending through dummy applications.
- Checkboxes: This allows you to create a number of different options and let a member tick multiple options. If you select this type it will give you an additional section for you to add your “Field Options”. Type the option name into the input field and click “Add” it will appear in a list below. If you wish to re-order the fields, click on the arrow located to the left of the field and drag it to where you would like it to be. To delete a field click on the rubbish bin icon on the far right of the field.
- Date: A simple date field with calendar selector.
- Email Address: An additional email address typically not associated with the primary member.
- File Upload: This allows people to upload a file or an image with their membership application. Once you have added this field, you can click on the cog to select if you would like to force a re-upload at renewal.
- HTML Content: This field type allows you to write content insert links, images etc and is typically used to link to Terms and Conditions of membership, which is located on another page.
- Horizontal Lines : This is just a visual line that will appear on your form to break up the content.
- Image Upload: This allows members to upload an image with their allocation.
- Member Company Name: Company name stored against member. Company name will then be displayed on all invoices and My Memberships tab.
- Member Date of Birth: Date of birth stored against member.
- Member Email: Secondary email for your member (primary email is stored in account creation).
- Member Gender: Gender stored against member.
- Member Mobile: Primary mobile number stored against the member.
- Member Phone: Primary phone number stored against the member.
- Member Physical Address: Members physical address.
- Member Postal Address: Members postal address.
- Member Profile Pic: A photo of the member to be stored against their profile
- Member Tags: All tags created within 'Member Tag Settings' will be available as options in this field.
- Numeric Input Field: A field that can store a string of numbers.
- Phone Number: Additional Phone Number.
- Plain Text Memo Field: This is a field that allows users to input long text answers i.e. descriptions, comments etc.
- Radio Buttons: This option allows you to create a number of options and ask members to select one. If you select this type it will give you an additional section for you to add your “Field Options”. Type the option name into the input field and click “Add” it will appear in a list below. If you wish to re-order the fields, click on the arrow located to the left of the field and drag it to where you would like it to be. To delete a field click on the rubbish bin icon on the far right of the field.
- Section Headings: This will allow you to create a heading to format your membership form into easier to read sections.
- Select Box: This type will allow you to create a dropdown list of options and allow your members to select one from the list. . If you select this type it will give you an additional section for you to add your “Field Options”. Type the option name into the input field and click “Add” it will appear in a list below. If you wish to re-order the fields, click on the arrow located to the left of the field and drag it to where you would like it to be. To delete a field click on the rubbish bin icon on the far right of the field.
- Text Input Field: This is the basic form field which allows users to enter text information.
- Time: A time field.
- Yes/No Radio Buttons: An easy way to add a Yes and No button option which allows members to select one option.
EDIT ACCOUNT CREATION FIELDS
To edit the settings or fields in the account creation section, click the edit icon ![]()
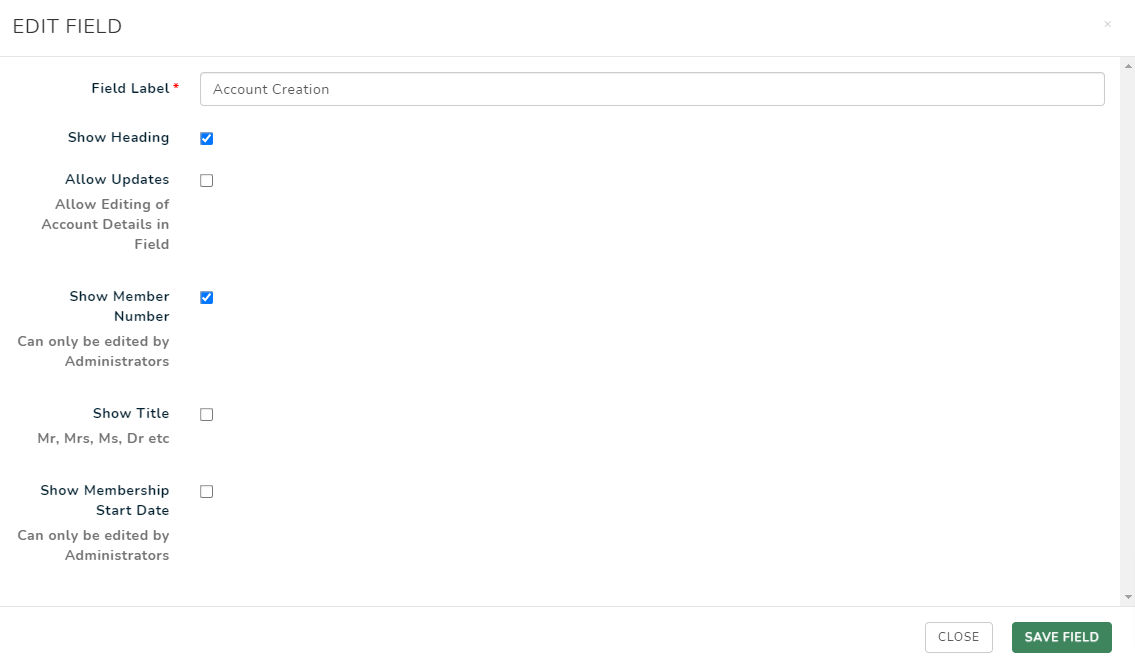 Here you can edit the heading (field label), and select if you would like the heading to display in your form or not by checking or unchecking the show heading check box. You can also;
- Show Heading: Show the Account Creation heading.
- Allow Updates: Checking this box will allow users to update the account creation information in their membership details.
- Show Member Number: Shows the members member number. Turning this on will allow administrators to edit the member number in the membership details. (Members will not be able to edit this information).
- Show Title: Show a member's prefix, e.g. Mr / Mrs / Dr.
- Show Membership Start Date: Show when a member joined the club.
Once you have selected your chosen settings, click "Save Field".
VIEW & EDIT MEMBER RESTRICTED FORM DATA
Administrators can view and edit all types of form data for their members in the membership administration area.
To do this:
- go to the Membership administration area, and search for the members name.
- click on the members name.
- select the "Memberships" tab from the member's pop-up.
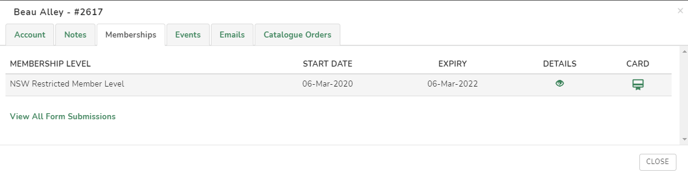
- select the "details" icon next to the membership you wish to review the data.
- this will display the members form data including all restricted fields.
- to edit this data, scroll to the bottom of the pop up, and select the edit icon. Once you have completed your changes, click save.
Watch a Video Snippet of one of our live training sessions