
Photo Gallery Module Page
The Photo Gallery Module page is set up by default on your site. To check this, please navigate to the Page Administration Area > Photos, or look for the page that displays this icon. ![]()

If you are unable to locate the Photo Gallery Module page, you can manually create a new page for this module and select ‘Photos’ as the module name. Please see more details here: Adding Pages.

Setting up Image Library Preferences
These options can be configured on the main module admin area.

- Thumbnail Width – Sets the width (in pixels) of the thumbnail images.
- Thumbnails Per Row – Controls how many thumbnail images appear in each row.
- Display Title With Thumbnail – Shows the image title under each thumbnail when enabled.
- Standard Image Width – Sets the width (in pixels) of the full-size image.
- Number of Recent Images to Display – Determines how many newly added images appear in the "Recent Photos" section.
- Display on Main Page
- Recent Photos – Displays the most recent images on the gallery's main page.
- Categories – Shows photo categories on the main page for easy navigation.
- Display Category Selection as Breadcrumbs – Shows category breadcrumb links at the top of the page.
- Show Image Title on Hover – Displays the image title when hovering over the thumbnail.
- Image Tags – Add and manage tags to categorise and filter images; unused tags can be deleted.
Photo Categories
To add, edit, or delete a Photo Category, select Categories from the left-hand menu.

You will be taken to a page where all of the current categories are displayed.
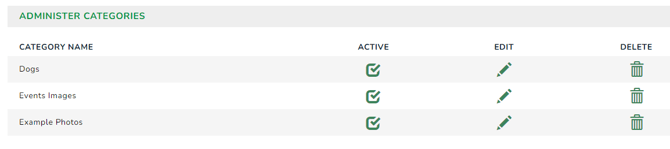
Adding a Photo Category
Scroll to the bottom of the category list to add a new category.
.png?width=670&height=368&name=Member-Jungle-Administer-Image-Library%20(1).png)
- Type in your desired category name in the field Category Name.
- Select a Parent Category if you wish this Category to belong to another Category, if not just select No Parent.
- Enter the category description if needed
- Click the Save & Close button.
Your screen will now be refreshed with your new category name appearing in the Categories List.
Note: Your category will be created as inactive by default, so it will not appear on your site until it is activated and has active photos in it.
Activating a Photo Category
Once you have added a new Photo Category, it will automatically be created as Inactive (therefore, the category will not be available for use on your website). 
To make your Photo Category Active, click on the red Activate button of the right of the name. The button will change to green. ![]()
Deactivating a Photo Category
To make a Photo Category Inactive, click on the green Activate button to the right of the name.
The button will change to red and will immediately be removed from your live website![]()
Editing a Photo Category
 A new Update Photos Category window will appear. Once you have made the relevant changes, click the Save & Close button.
Deleting a Photo Category
To permanently delete one of your categories, you need to ensure that there are no Photo items assigned to the category. If there are no Photo items assigned, click on the Delete button located to the right of the category that you wish to delete. 
If there are Photo items assigned to the category, you will need to individually delete or edit each Photo item and re-assign it to another category.
A warning screen will appear; click OK to proceed with the deletion.
Adding and Managing Photos
To view, add, edit, or delete Photo/Image items, select Image Library from the left-hand menu.

To view current Photos/Images, select a Category, and click the Select button.

The Photos/Images within this Category will be listed.
Adding a Single Photo
Supported Photo/Image Formats: JPG, GIF, PNG, JPEG.
-
Ways to Add a Photo to Your Gallery:
- Individually – add one image at a time.
- Multiple Image Upload – add several images at once.
Steps to Add a Photo:
- Click on the Image Library icon in the Left Navigation Menu.
- Select the relevant category from the dropdown for the Photo/Image.

- Type in the Image Title: this is the name that the item will be referenced.
- Type in the Alt Tag: An alt tag is a description of the image that screen readers use. Alt tags are also used by search engines in determining what your photos are of.
- Select the appropriate Image Category from the list.
- Type in the Display Order in Category: this optional field allows you to control the order that each Photo/Item will appear within this category. Use a numeric value
- Upload File: click on the SELECT IMAGE button and browse your computer to find the required image, and click open.
- Resize Uploaded Image Width: this is a check box, click this box for the image to be resized as it is uploaded.
- New Width : If you have ticked the box above, specify the number of pixels you would like your image resized to. Your website is 1170px wide, we recommend that is the maximum you upload images so you don't slow your website performance down.
- Type in the Brief Description: this is a brief description of the image, if required, this description is shown on the live website if users click on the images and scroll through the gallery
- Once you have completed the fields, click the Save & Close button.
- The new Photo will automatically be created as Inactive (therefore the visible on your website).
- To make your Photo Active, click on the red Activate button of the right of the name. The button will change to green.
Adding Multiple Photos
To add multiple Photo/Image items at the same time, select Multiple Image Upload from the left-hand menu.

Choose the category where you want the Photo/Image to be grouped. This determines how your images are organised in the gallery.

-
Resize Images:
-
Click the Resize box if you want your images resized.
-
Enter the desired number of pixels for the resized image.
-
Recommendation: Our website width is 1170px. Uploading images larger than this can slow down your website, so use 1170px as the maximum width.
-
-
Attach Images:
-
Drag and Drop: Drag your images onto the Drop Files Here box.
-
Select Button: Click Select to browse and choose your image.
-
To select multiple images at once, hold down the CTRL or SHIFT key while browsing, then click Open.
-
-
The images will start uploading, and you can watch their progress.
-
Once uploaded, the images will appear as Completed.

Once the upload is complete, click the "Close" button. Your images will be uploaded and live immediately (if the category is active).
Editing a Photo Item

- To edit an existing Photo/Image item click on the Edit button located to the right of the Photo/Image item that you wish to change in the Administer Image Library Area.

- An Update Photo/Image box will appear with the same fields as the New Photo/Image box. It will contain the same options as above in the "Add Single Photos" section above.
- Once you have made the relevant changes, click the Save & Close button.
Selecting a Main Category Image
To make an image the main image for that category, click on the MAIN IMAGE button.

Deleting a Photo Item
To delete an image, click the delete button for the image.

Displaying Photo Gallery or Selected Categories on a Page
You can show your photos on pages besides the Photo Gallery module page by using the Photos Widget. Simply add the widget to the desired page to display images from your gallery.

Adding the Photos Widget to a Page:
-
Navigate to the page where you want to display your photos.

-
Click the Widget icon.

-
Select Add a Widget.
-
Navigate to and select Photos Widgets.

-
Click the gear icon to configure the widget.


-
This is the result.

How to Configure the News Module in the Mobile App
The Photo Gallery Module is already configured in the mobile app by default, so you can skip the setup steps if it’s already visible.
However, if you need to ensure it appears in the app, here’s what to do:
-
Go to Module > Member Jungle Mobile app > App Settings.
-
Locate the list of modules available for display.
-
Make sure the “Photo” module is ticked under the “Show in the App” option.
That’s it! Once enabled, your News items will be visible to members directly within the mobile app.

How to View Photo Items in the Mobile App
Viewing Photos in the Mobile App:
- Log in to your mobile app.
- On your dashboard, tap the Photos section.
- All photos will be displayed on your screen.
- Use the category at the top to filter images.
- Tap an image to view it, then scroll left or right to see other images.
That’s it! You can now easily stay updated with the latest photos directly from your app.


